To create a digital downloadable products eCommerce website using WordPress, a server environment, and plugins like Elementor, follow this step-by-step guide:
1. Set Up a Local/Live Server:
Local Server (for testing):
- Install XAMPP or Local by Flywheel to create a local development environment.
- Place WordPress files in the
htdocsfolder (e.g.,C:\xampp\htdocs\).
Live Server (for production):
- Purchase a domain and hosting service (e.g., Bluehost, SiteGround).
- Use cPanel or your hosting provider’s dashboard to install WordPress.
2. Install WordPress:
- Download WordPress from wordpress.org.
- Extract the WordPress files and place them in the server’s root directory (
htdocsfor XAMPP). - Set up the database:
- Go to
localhost/phpmyadmin(local server) or your hosting’s database manager. - Create a new database (e.g.,
wordpress_db).
- Go to
- Open your browser and go to
http://localhost/your-folder-nameor your domain. - Follow the WordPress installation steps, entering the database name, username, and password.
3. Install Essential Plugins:
- WooCommerce:
- Go to Plugins > Add New and search for WooCommerce.
- Install and activate it.
- Configure WooCommerce for selling digital products:
- Navigate to WooCommerce > Settings > Products.
- Set Downloadable Products options (e.g., enable file downloads after payment).
- Configure payment gateways (PayPal, Stripe, etc.).
- Elementor:
- Install Elementor for drag-and-drop page building.
- If you want additional functionality, install Elementor Pro.
- Download Manager (optional for advanced downloads):
- Use this plugin for better file management.
- Yoast SEO or Rank Math:
- Optimize your site for search engines.
- WP Super Cache or W3 Total Cache:
- Speed up your website.
4. Install a WooCommerce-Compatible Theme:
Choose a theme designed for eCommerce and digital products:
- Astra (with WooCommerce and Elementor integration).
- OceanWP.
- GeneratePress.
5. Create Pages Using Elementor:
Use Elementor to design essential pages:
- Home Page:
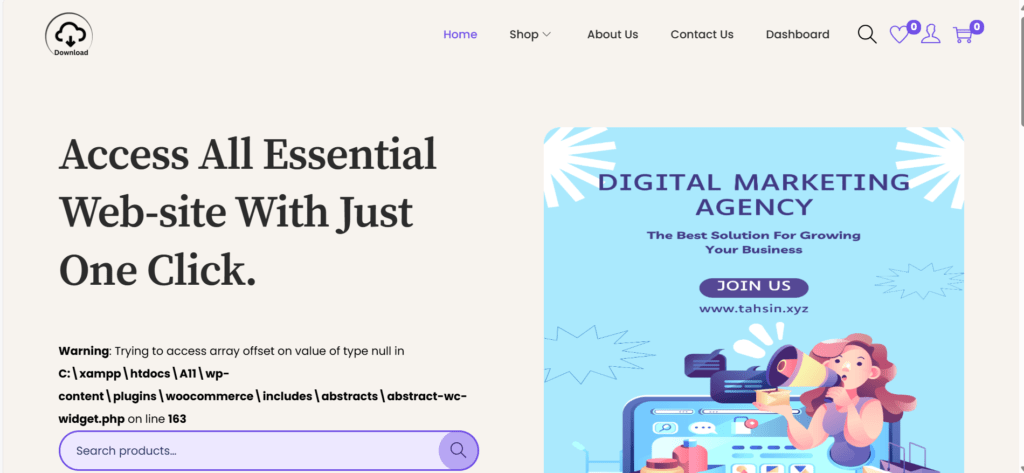
- Add a headline (e.g., “Access All Essential Digital Products with Just One Click”).
- Include attractive visuals and CTAs.
- Shop Page:
- WooCommerce automatically creates this. Use Elementor WooCommerce widgets to customize it.
- Product Pages:
- Add digital products in WooCommerce > Products > Add New.
- Under Product Data, set the product as Downloadable.
- About Us, Contact Us, Dashboard:
- Design these pages using Elementor.
6. Fix PHP Error (Array Offset on Null):
The error in your screenshot occurs due to an issue in WooCommerce’s abstract-wc-widget.php. To resolve:
- Update Everything:
- Ensure WooCommerce, WordPress, PHP, and your theme are up-to-date.
- Debug the Issue:
- Open the file (
abstract-wc-widget.php) at the mentioned line (163). - Wrap the code with a null check:phpCopy code
if (isset($array['key'])) { // Execute the code safely. }
- Open the file (
- Switch to a Default Theme:
- Activate a theme like Twenty Twenty-Three to check if the issue is theme-related.
- Reinstall WooCommerce:
- Delete and reinstall WooCommerce to replace any corrupted files.
7. Test the Site:
- Add sample products and ensure downloads work after purchase.
- Test the checkout process and payment gateway.
8. Launch the Website:
- Move your local WordPress site to a live server using plugins like All-in-One WP Migration.
- Set up SSL for secure transactions.
For further assistance, contact Tahsin.xyz